
Qwen-Image-Edit-2509教程:一键生成电商多角度产品图(下)
文章摘要
这篇文章教你用一张普通产品图,生成一整套专业级多角度照片。读完之后,你会明白如何用Qwen图像编辑模型和多角度LoRA,轻松做出左转45°、俯拍、广角、特写等效果,全程AI完成,几乎零成本。让你懂得模型加载、角度控制、画幅适配、加速推理这些关键知识,个人卖家也能拥有工作室级的产品图生产能力。

国内部署方案
方案一、魔塔社区本地部署
国内用户访问Hugging Fac可能不稳定,可以使用魔塔社区部署
1.安装依赖
# 安装魔塔SDK和Diffusers
pip install modelscope -U
pip install git+https://github.com/huggingface/diffusers
pip install torch torchvision torchaudio --index-url https://download.pytorch.org/whl/cu121
pip install transformers accelerate safetensors pillow opencv-python-headless gradio
2.完整应用代码
import torch
from PIL import Image
from modelscope import QwenImageEditPlusPipeline # 注意:从modelscope导入
import gradio as gr
# ============= GPU配置(保持不变) =============
def get_gpu_config():
if not torch.cuda.is_available():
return {
'device': 'cpu',
'dtype': torch.float32,
'gpu_name': 'CPU',
'vram_gb': 0,
'max_batch': 1,
'enable_attention_slicing': True,
'enable_vae_slicing': True,
}
gpu_name = torch.cuda.get_device_name(0)
vram_gb = torch.cuda.get_device_properties(0).total_memory / 1e9
if 'T4' in gpu_name or vram_gb < 20:
return {
'device': 'cuda',
'dtype': torch.bfloat16,
'gpu_name': gpu_name,
'vram_gb': vram_gb,
'max_batch': 1,
'enable_attention_slicing': True,
'enable_vae_slicing': True,
}
else:
return {
'device': 'cuda',
'dtype': torch.bfloat16,
'gpu_name': gpu_name,
'vram_gb': vram_gb,
'max_batch': 2,
'enable_attention_slicing': False,
'enable_vae_slicing': False,
}
gpu_config = get_gpu_config()
print(f"检测到GPU: {gpu_config['gpu_name']} ({gpu_config['vram_gb']:.1f}GB)")
# ============= 模型配置(魔塔版本) =============
ANGLE_MACROS = {
"Wide-angle": "将镜头转为广角镜头",
"Close-up": "将镜头转为特写镜头",
"Forward": "将镜头向前移动",
"Left": "将镜头向左移动",
"Right": "将镜头向右移动",
"Down": "将镜头向下移动",
"Rotate 45° Left": "将镜头向左旋转45度",
"Rotate 45° Right": "将镜头向右旋转45度",
"Top-down": "将镜头转为俯视",
}
BACKGROUND_PRESETS = {
"(None)": None,
"Pure Studio (white seamless)": "in a professional studio with seamless white background, soft shadows, product centered",
"Soft Gray Studio": "in a professional studio with seamless soft gray background, gentle vignette, softbox lighting",
"Lifestyle (cozy desk)": "on a cozy wooden desk near a window, soft natural light, minimal props",
"Lifestyle (marble)": "on a clean white marble surface, bright daylight, subtle reflections",
"Lifestyle (outdoor)": "outdoors on a neutral table, soft shade, bokeh background",
}
ASPECT_RATIOS = {
"1:1 (Square)": (1024, 1024),
"4:3 (Standard)": (1024, 768),
"3:4 (Portrait)": (768, 1024),
"16:9 (Widescreen)": (1024, 576),
"9:16 (Mobile)": (576, 1024),
"3:2 (Photo)": (1024, 683),
"2:3 (Portrait Photo)": (683, 1024),
}
# ============= 加载模型(魔塔社区) =============
print("正在从魔塔社区加载模型...")
pipe = QwenImageEditPlusPipeline.from_pretrained(
"Qwen/Qwen-Image-Edit-2509", # 魔塔模型ID
torch_dtype=gpu_config['dtype']
)
print("✅ 模型加载完成")
pipe.to(gpu_config['device'])
if gpu_config['enable_attention_slicing']:
pipe.enable_attention_slicing()
if gpu_config['enable_vae_slicing']:
pipe.enable_vae_slicing()
# ⚠️ 注意:魔塔版本暂不支持LoRA加载,以下代码可以注释掉
# 如果需要角度控制功能,建议使用方案二(硅基流动API)
# pipe.load_lora_weights(LORA_ANGLES, adapter_name="angles")
print("Pipeline准备就绪!")
# ============= 工具函数(保持不变) =============
def compose_prompt(angle_phrase: str,
bg_preset_text: Optional[str],
custom_scene: str,
extra_style: str) -> str:
parts = [angle_phrase]
if bg_preset_text:
parts.append(f"{bg_preset_text}")
if custom_scene.strip():
parts.append(custom_scene.strip())
if extra_style.strip():
parts.append(extra_style.strip())
return " | ".join(parts)
def resize_image(img: Image.Image, target_size: Tuple[int, int]) -> Image.Image:
target_w, target_h = target_size
orig_w, orig_h = img.size
scale = max(target_w / orig_w, target_h / orig_h)
new_w = int(orig_w * scale)
new_h = int(orig_h * scale)
img = img.resize((new_w, new_h), Image.Resampling.LANCZOS)
left = (new_w - target_w) // 2
top = (new_h - target_h) // 2
img = img.crop((left, top, left + target_w, top + target_h))
return img
# ============= 生成函数(魔塔版本简化) =============
def generate_images(
source_img: Image.Image,
angle_keys: List[str],
bg_key: str,
custom_scene: str,
extra_style: str,
aspect_ratio: str,
seed: int,
steps: int,
guidance_scale: float,
true_cfg_scale: float,
images_per_prompt: int,
progress=gr.Progress()
) -> List[Image.Image]:
if source_img is None:
return [], "⚠️ 请先上传产品图!"
if not angle_keys:
return [], "⚠️ 请至少选择一个角度!"
target_size = ASPECT_RATIOS[aspect_ratio]
source_img = resize_image(source_img, target_size)
results = []
generator = torch.manual_seed(seed)
bg_preset_text = BACKGROUND_PRESETS.get(bg_key)
total_angles = len(angle_keys)
for idx, angle_name in enumerate(angle_keys):
progress((idx + 1) / total_angles, f"正在生成 {angle_name}...")
angle_phrase = ANGLE_MACROS[angle_name]
full_prompt = compose_prompt(angle_phrase, bg_preset_text, custom_scene, extra_style)
inputs = {
"image": [source_img],
"prompt": full_prompt,
"generator": generator,
"true_cfg_scale": true_cfg_scale,
"negative_prompt": " ",
"num_inference_steps": steps,
"guidance_scale": guidance_scale,
"num_images_per_prompt": images_per_prompt,
"height": target_size[1],
"width": target_size[0],
}
with torch.inference_mode():
out = pipe(**inputs)
for img_idx, im in enumerate(out.images):
results.append(im)
if 'T4' in gpu_config['gpu_name']:
torch.cuda.empty_cache()
return results
def create_zip(images: List[Image.Image]) -> Optional[str]:
if not images:
return None
import zipfile
import io
zip_path = "/tmp/product_shot_booster.zip"
with zipfile.ZipFile(zip_path, mode="w", compression=zipfile.ZIP_DEFLATED) as zf:
zf.writestr("manifest.txt", "产品图生成器导出\n生成时间: {}\n".format(
__import__('datetime').datetime.now().strftime("%Y-%m-%d %H:%M:%S")
))
for idx, img in enumerate(images):
buf = io.BytesIO()
img.save(buf, format="PNG")
zf.writestr(f"angle_{idx+1:03d}.png", buf.getvalue())
return zip_path
# ============= Gradio UI(保持不变,省略重复代码) =============
# ... (使用前文的完整Gradio代码)
方案二、硅基流动API服务(推荐轻量化场景)
如果本地GPU不足,可以使用硅基流动的API服务
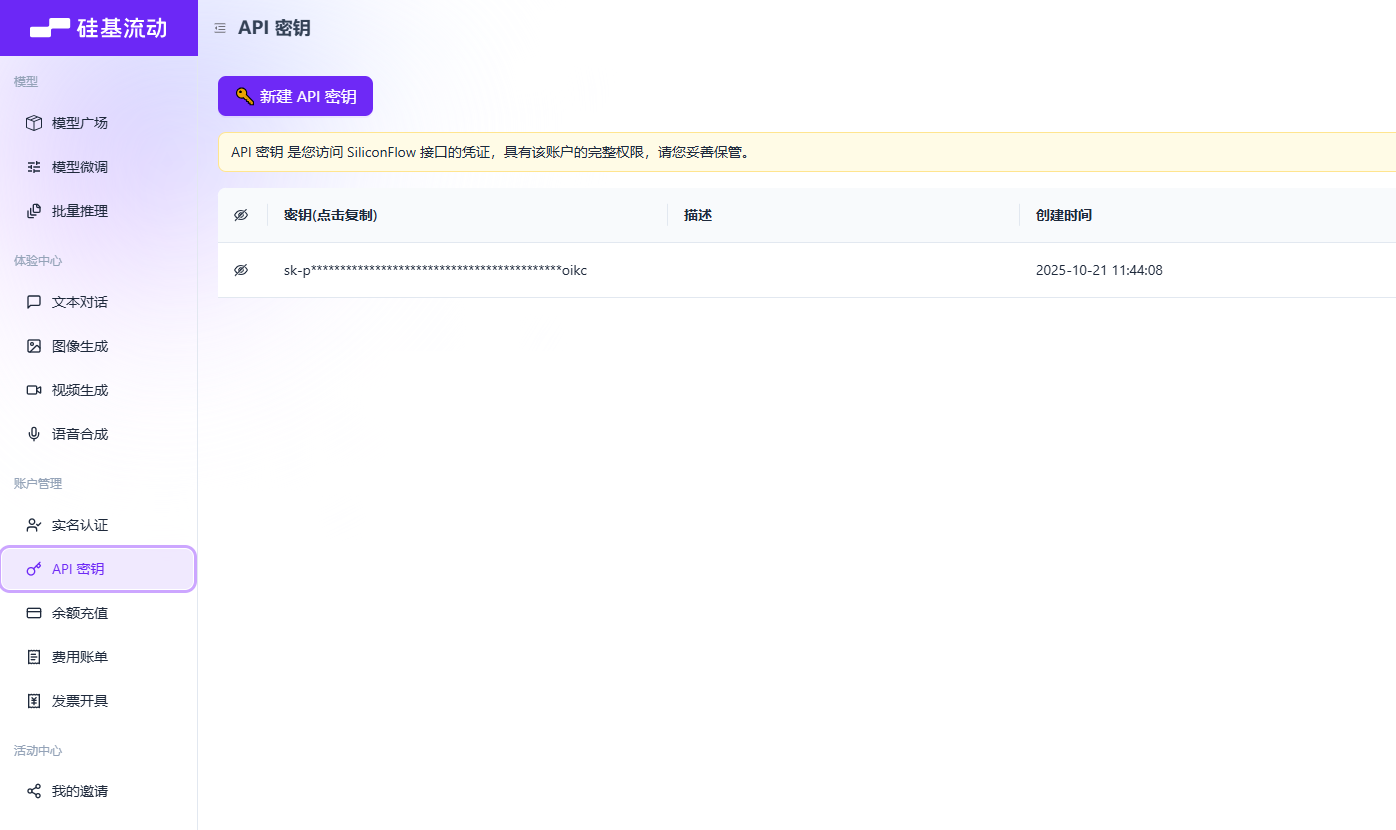
1.注册并获取API Key
API密钥 → 新建密钥
2. 完整API调用代码
import requests
import base64
import json
from PIL import Image
from io import BytesIO
from typing import List, Optional
import gradio as gr
# ============= 配置API密钥 =============
SILICONFLOW_API_KEY = "sk-xxxxxxxxxxxxxx" # 替换为你的密钥
API_BASE_URL = "https://api.siliconflow.cn/v1"
# ============= 角度和背景配置(同前文) =============
ANGLE_MACROS = {
"Wide-angle": "将镜头转为广角镜头",
"Close-up": "将镜头转为特写镜头",
"Forward": "将镜头向前移动",
"Left": "将镜头向左移动",
"Right": "将镜头向右移动",
"Down": "将镜头向下移动",
"Rotate 45° Left": "将镜头向左旋转45度",
"Rotate 45° Right": "将镜头向右旋转45度",
"Top-down": "将镜头转为俯视",
}
BACKGROUND_PRESETS = {
"(None)": None,
"Pure Studio (white seamless)": "in a professional studio with seamless white background, soft shadows, product centered",
"Soft Gray Studio": "in a professional studio with seamless soft gray background, gentle vignette, softbox lighting",
"Lifestyle (cozy desk)": "on a cozy wooden desk near a window, soft natural light, minimal props",
"Lifestyle (marble)": "on a clean white marble surface, bright daylight, subtle reflections",
}
ASPECT_RATIOS = {
"1:1 (Square)": (1024, 1024),
"4:3 (Standard)": (1024, 768),
"3:4 (Portrait)": (768, 1024),
}
# ============= 工具函数 =============
def compose_prompt(angle_phrase: str,
bg_preset_text: Optional[str],
custom_scene: str,
extra_style: str) -> str:
parts = [angle_phrase]
if bg_preset_text:
parts.append(f"{bg_preset_text}")
if custom_scene.strip():
parts.append(custom_scene.strip())
if extra_style.strip():
parts.append(extra_style.strip())
return " | ".join(parts)
def image_to_base64(img: Image.Image) -> str:
"""将PIL图像转为Base64字符串"""
buffered = BytesIO()
img.save(buffered, format="PNG")
return base64.b64encode(buffered.getvalue()).decode()
def base64_to_image(b64_str: str) -> Image.Image:
"""将Base64字符串转为PIL图像"""
img_data = base64.b64decode(b64_str)
return Image.open(BytesIO(img_data))
# ============= 核心API调用函数 =============
def call_siliconflow_api(
image: Image.Image,
prompt: str,
width: int = 1024,
height: int = 1024,
steps: int = 28,
guidance_scale: float = 1.0,
seed: int = 123
) -> Image.Image:
"""
调用硅基流动API生成图像
Args:
image: 输入图像(PIL格式)
prompt: 编辑指令
width/height: 输出尺寸
steps: 推理步数
guidance_scale: CFG引导强度
seed: 随机种子
Returns:
生成的PIL图像
"""
# 1. 图像转Base64
img_base64 = image_to_base64(image)
# 2. 构造请求
url = f"{API_BASE_URL}/image/edit"
headers = {
"Authorization": f"Bearer {SILICONFLOW_API_KEY}",
"Content-Type": "application/json"
}
payload = {
"model": "Qwen/Qwen-Image-Edit-2509",
"image": img_base64,
"prompt": prompt,
"width": width,
"height": height,
"num_inference_steps": steps,
"guidance_scale": guidance_scale,
"seed": seed,
"response_format": "b64_json" # 返回Base64格式
}
# 3. 发送请求
try:
response = requests.post(url, json=payload, headers=headers, timeout=60)
response.raise_for_status()
result = response.json()
# 4. 解析返回结果
if "data" in result and len(result["data"]) > 0:
b64_img = result["data"][0]["b64_json"]
return base64_to_image(b64_img)
else:
raise Exception(f"API返回异常: {result}")
except requests.exceptions.RequestException as e:
raise Exception(f"API调用失败: {str(e)}")
# ============= 批量生成函数 =============
def generate_images_api(
source_img: Image.Image,
angle_keys: List[str],
bg_key: str,
custom_scene: str,
extra_style: str,
aspect_ratio: str,
seed: int,
steps: int,
guidance_scale: float,
progress=gr.Progress()
) -> List[Image.Image]:
"""使用硅基流动API批量生成多角度图像"""
if source_img is None:
return []
if not angle_keys:
return []
# 调整图像尺寸
target_size = ASPECT_RATIOS[aspect_ratio]
source_img = source_img.resize(target_size, Image.Resampling.LANCZOS)
results = []
bg_preset_text = BACKGROUND_PRESETS.get(bg_key)
total_angles = len(angle_keys)
for idx, angle_name in enumerate(angle_keys):
progress((idx + 1) / total_angles, f"正在生成 {angle_name}...")
# 组装提示词
angle_phrase = ANGLE_MACROS[angle_name]
full_prompt = compose_prompt(angle_phrase, bg_preset_text, custom_scene, extra_style)
# 调用API
try:
result_img = call_siliconflow_api(
image=source_img,
prompt=full_prompt,
width=target_size[0],
height=target_size[1],
steps=steps,
guidance_scale=guidance_scale,
seed=seed
)
results.append(result_img)
print(f"✅ {angle_name} 生成成功")
except Exception as e:
print(f"❌ {angle_name} 生成失败: {str(e)}")
# 失败时返回原图(避免中断流程)
results.append(source_img.copy())
return results
def create_zip(images: List[Image.Image]) -> Optional[str]:
"""打包ZIP文件"""
if not images:
return None
import zipfile
import io
zip_path = "/tmp/product_shot_api.zip"
with zipfile.ZipFile(zip_path, mode="w", compression=zipfile.ZIP_DEFLATED) as zf:
for idx, img in enumerate(images):
buf = io.BytesIO()
img.save(buf, format="PNG")
zf.writestr(f"angle_{idx+1:03d}.png", buf.getvalue())
return zip_path
# ============= Gradio UI =============
with gr.Blocks(title="产品图生成器(API版)", theme=gr.themes.Soft()) as demo:
gr.Markdown("# AI产品图多角度生成器(硅基流动API版)")
gr.Markdown(" 无需GPU,按需付费,新用户赠送免费额度")
with gr.Row():
with gr.Column(scale=1):
input_image = gr.Image(label="上传产品图", type="pil", height=300)
angle_choices = gr.CheckboxGroup(
choices=list(ANGLE_MACROS.keys()),
value=["Wide-angle", "Close-up", "Top-down"],
label="📐 相机角度(可多选)"
)
aspect_ratio = gr.Dropdown(
choices=list(ASPECT_RATIOS.keys()),
value="1:1 (Square)",
label="画幅比例"
)
bg_preset = gr.Dropdown(
choices=list(BACKGROUND_PRESETS.keys()),
value="(None)",
label="背景预设"
)
custom_scene = gr.Textbox(
label="自定义场景(可选)",
placeholder="例如: 放在深色木质桌面上",
lines=2
)
extra_style = gr.Textbox(
label="风格补充",
value="studio-grade lighting, high clarity",
lines=2
)
with gr.Column(scale=2):
output_gallery = gr.Gallery(
label="生成结果",
columns=3,
height="auto"
)
zip_output = gr.File(label="打包下载")
with gr.Accordion("⚙️ 高级设置", open=False):
with gr.Row():
seed = gr.Number(label="随机种子", value=123, precision=0)
steps = gr.Slider(label="推理步数", minimum=10, maximum=50, value=28, step=1)
guidance_scale = gr.Slider(label="CFG强度", minimum=0.0, maximum=5.0, value=1.0, step=0.1)
generate_btn = gr.Button("开始生成", variant="primary", size="lg")
def generate_and_zip(*args):
images = generate_images_api(*args)
zip_file = create_zip(images) if images else None
return images, zip_file
generate_btn.click(
fn=generate_and_zip,
inputs=[
input_image, angle_choices, bg_preset, custom_scene,
extra_style, aspect_ratio, seed, steps, guidance_scale
],
outputs=[output_gallery, zip_output]
)
demo.launch(share=True, debug=True)
写在最后
AI图像生成技术正在重塑电商视觉生产流程,从雇摄影师拍5000元到AI生成成本5元。
Qwen-Image-Edit + 多角度LoRA的方案,代表了当前开源+可控+低成本的实践。
希望本文能帮助你快速上手,并在实际业务中落地应用。
以上内容不代表本平台立场,仅供读者参考
