第一部分:项目概述与环境准备
1.1 项目背景与意义
在开始编码之前,让我们先了解为什么需要这样一个系统。农业病虫害是影响农作物产量和质量的重要因素,传统的目视检查方法效率低下且容易遗漏。通过计算机视觉技术,我们可以实现自动化的病虫害检测,帮助农民及时发现问题并采取防治措施。
项目目标:
- 使用YOLOv5检测农田中的昆虫、动物等潜在威胁
- 评估病虫害风险等级
- 提供可视化的检测结果和处理建议
1.2 创建PyCharm项目
现在让我们在PyCharm中创建项目。良好的项目结构是代码可维护性的基础,这一步虽然简单但很重要。
操作步骤:
- 打开PyCharm,点击
File → New Project - 设置项目位置:
D:\AgriculturePestDetection - 选择Python解释器:使用您之前配置的yolov5环境
- 取消"Create Git repository"(初学者可选)
- 勾选"Create a main.py welcome script"
- 点击
Create
为什么这样做:
- 单独的项目文件夹便于管理代码和资源
- 使用已有的yolov5环境避免重复配置
- 创建main.py作为项目入口点
1.3 验证环境配置
创建项目后,我们需要确认环境配置正确。这一步可以避免后续出现依赖包缺失的问题。
在PyCharm中打开自动创建的main.py,替换内容为:
import torch
import cv2
import numpy as np
print("=" * 50)
print("环境验证检查")
print("=" * 50)
print(f"PyTorch版本: {torch.__version__}")
print(f"OpenCV版本: {cv2.__version__}")
print(f"NumPy版本: {np.__version__}")
print(f"CUDA是否可用: {torch.cuda.is_available()}")
if torch.cuda.is_available():
print(f"GPU设备: {torch.cuda.get_device_name(0)}")
try:
model = torch.hub.load('ultralytics/yolov5', 'yolov5s', pretrained=True)
print("✅ YOLOv5模型加载成功!")
except Exception as e:
print(f"❌ YOLOv5加载失败: {e}")
print("环境验证完成!")
运行验证:
- 右键点击编辑器 →
Run 'main' - 或点击右上角绿色三角按钮
预期结果:
PyTorch版本: 2.4.1+cpu
OpenCV版本: 4.8.1
NumPy版本: 1.24.3
CUDA是否可用: False
✅ YOLOv5模型加载成功!
为什么需要验证:
- 确保所有必要的库已正确安装
- 确认YOLOv5可以正常加载
- 为后续开发排除环境问题
第二部分:项目结构与核心代码实现
2.1 创建项目文件结构
环境验证通过后,我们需要建立清晰的项目结构。良好的组织结构能让代码更易维护和扩展。
操作步骤:
在PyCharm项目窗口中:
- 右键项目根目录 →
New → Directory - 创建以下文件夹:
data - 存放测试图片reports - 存放生成的检测报告utils - 存放工具模块
创建后的结构:
AgriculturePestDetection/
├── data/ # 测试数据
├── reports/ # 输出报告
├── utils/ # 工具模块
└── main.py # 主程序
为什么这样组织:
data文件夹集中管理测试图片reports文件夹统一存放输出结果utils文件夹便于模块化开发
2.2 创建农业病虫害检测器类
现在开始编写核心代码。我们将创建一个专门的类来封装所有检测功能,这样代码更加模块化且易于测试。
在项目根目录创建 agriculture_pest_detector.py:
import torch
import cv2
import numpy as np
import os
import sys
from datetime import datetime
import warnings
from PIL import Image, ImageDraw, ImageFont
os.environ['KMP_DUPLICATE_LIB_OK'] = 'True'
warnings.filterwarnings("ignore", category=FutureWarning)
class AgriculturePestDetector:
def __init__(self):
"""
初始化农业病虫害检测器
"""
print("正在加载YOLOv5模型...")
try:
self.model = torch.hub.load('ultralytics/yolov5', 'yolov5s', pretrained=True, force_reload=False)
self.model.conf = 0.3
self.model.iou = 0.45
print("✅ YOLOv5模型加载成功!")
except Exception as e:
print(f"❌ YOLOv5模型加载失败: {e}")
sys.exit(1)
self.agriculture_categories = {
'animal': ['bird', 'cat', 'dog', 'sheep', 'cow', 'horse', 'elephant', 'bear', 'zebra', 'giraffe'],
'vehicle': ['car', 'truck', 'bus', 'motorcycle', 'bicycle', 'train'],
'other': []
}
self.severity_levels = {
'low': {'name': '轻微', 'color': (0, 255, 0)},
'medium': {'name': '中等', 'color': (0, 255, 255)},
'high': {'name': '严重', 'color': (0, 0, 255)}
}
print("✅ 农业病虫害检测器初始化完成!")
代码解析:
torch.hub.load() 从PyTorch Hub加载预训练的YOLOv5模型agriculture_categories 将COCO数据集类别映射到农业相关分类severity_levels 定义风险等级的颜色和名称
为什么这样设计:
- 使用类封装提高代码复用性
- 类别映射让检测结果更符合农业场景
- 风险等级为后续评估提供基础
2.3 实现物体检测与分类方法
有了检测器框架后,我们需要实现核心的检测和分类方法。这些方法将处理图片并识别其中的农业相关物体。
在 AgriculturePestDetector 类中添加以下方法:
def detect_agriculture_objects(self, image_path):
"""
检测图片中的农业相关物体
"""
if not os.path.exists(image_path):
raise FileNotFoundError(f"图片文件不存在: {image_path}")
try:
results = self.model(image_path)
detections = results.pandas().xyxy[0]
agriculture_detections = []
for _, detection in detections.iterrows():
obj_name = detection['name']
confidence = detection['confidence']
obj_category = self._categorize_object(obj_name)
agriculture_detections.append({
'name': obj_name,
'category': obj_category,
'confidence': round(confidence, 3),
'bbox': [
int(detection['xmin']),
int(detection['ymin']),
int(detection['xmax']),
int(detection['ymax'])
]
})
return agriculture_detections
except Exception as e:
print(f"❌ 物体检测失败: {e}")
return []
def _categorize_object(self, object_name):
"""
内部方法:将检测到的物体分类到农业类别
"""
for category, items in self.agriculture_categories.items():
if object_name in items:
return category
return 'other'
代码解析:
detect_agriculture_objects() 使用YOLOv5检测并过滤农业相关物体_categorize_object() 内部方法用于物体分类results.pandas().xyxy[0] 获取检测结果的DataFrame格式
为什么这样实现:
- 分离检测和分类逻辑,便于单独测试
- 使用内部方法隐藏实现细节
- 返回结构化的数据便于后续处理
第三部分:风险评估与可视化
3.1 实现风险评估逻辑
检测到物体后,我们需要评估其对农作物的风险程度。不同的物体对作物的威胁程度不同,我们需要建立一个评估体系。
在类中添加风险评估方法:
def assess_pest_risk(self, detections):
"""
评估病虫害风险等级
"""
agriculture_detections = [d for d in detections if d['category'] != 'other']
if not agriculture_detections:
return {
'risk_level': 'low',
'risk_score': 0,
'pest_count': 0,
'suggestion': "未检测到农业相关物体,作物状态良好",
'detected_categories': [],
'total_objects': len(detections),
'agriculture_objects': 0
}
risk_score = 0
pest_count = 0
detected_categories = set()
for detection in agriculture_detections:
category = detection['category']
confidence = detection['confidence']
detected_categories.add(category)
if category == 'animal':
risk_score += 2
elif category == 'vehicle':
risk_score += 1
risk_score += confidence
if risk_score == 0:
risk_level = 'low'
suggestion = "作物状态良好,无需处理"
elif risk_score <= 3:
risk_level = 'low'
suggestion = "轻微风险,建议观察"
elif risk_score <= 6:
risk_level = 'medium'
suggestion = "中等风险,建议预防性处理"
else:
risk_level = 'high'
suggestion = "高风险,需要立即处理"
return {
'risk_level': risk_level,
'risk_score': round(risk_score, 2),
'pest_count': pest_count,
'suggestion': suggestion,
'detected_categories': list(detected_categories),
'total_objects': len(detections),
'agriculture_objects': len(agriculture_detections)
}
风险评估逻辑:
- 昆虫类:风险最高(+3分),直接威胁作物
- 动物类:风险中等(+2分),可能破坏农田
- 车辆类:风险较低(+1分),可能造成间接影响
- 置信度:影响分数,高置信度检测更可信
为什么这样评分:
- 基于农业实际场景的威胁程度
- 分数累加机制反映多重威胁
- 置信度加权提高评估准确性
3.2 实现结果可视化
为了让用户直观地理解检测结果,我们需要将结果可视化显示在图片上。好的可视化能大大提高系统的可用性。
添加可视化方法:
def visualize_results(self, image_path, detections, risk_assessment):
"""
使用PIL正确显示中文字符
"""
try:
pil_image = Image.open(image_path)
draw = ImageDraw.Draw(pil_image)
try:
font_paths = [
"C:/Windows/Fonts/simhei.ttf",
"C:/Windows/Fonts/simsun.ttc",
"C:/Windows/Fonts/msyh.ttc",
"simhei.ttf"
]
font = None
for font_path in font_paths:
if os.path.exists(font_path):
try:
font = ImageFont.truetype(font_path, 20)
small_font = ImageFont.truetype(font_path, 16)
break
except:
continue
if font is None:
font = ImageFont.load_default()
small_font = ImageFont.load_default()
print("⚠️ 未找到中文字体,可能无法正确显示中文")
except Exception as e:
print(f"⚠️ 字体加载失败: {e}")
font = ImageFont.load_default()
small_font = ImageFont.load_default()
for detection in detections:
x1, y1, x2, y2 = detection['bbox']
name = detection['name']
category = detection['category']
confidence = detection['confidence']
if category == 'animal':
color = (255, 165, 0)
elif category == 'vehicle':
color = (0, 255, 0)
else:
color = (128, 128, 128)
draw.rectangle([x1, y1, x2, y2], outline=color, width=3)
label = f"{name} ({confidence:.2f})"
text_bbox = draw.textbbox((0, 0), label, font=small_font)
text_width = text_bbox[2] - text_bbox[0]
draw.rectangle([x1, y1 - 25, x1 + text_width + 10, y1], fill=color)
draw.text((x1 + 5, y1 - 20), label, fill=(255, 255, 255), font=small_font)
risk_info = risk_assessment
required_keys = ['risk_level', 'risk_score', 'pest_count', 'suggestion', 'total_objects',
'agriculture_objects']
for key in required_keys:
if key not in risk_info:
if key in ['risk_score', 'pest_count', 'total_objects', 'agriculture_objects']:
risk_info[key] = 0
else:
risk_info[key] = 'unknown'
risk_color = self.severity_levels.get(
risk_info['risk_level'],
self.severity_levels['low']
)['color']
if len(risk_color) == 3:
risk_color = (risk_color[2], risk_color[1], risk_color[0])
info_texts = [
f"风险评估: {self.severity_levels.get(risk_info['risk_level'], self.severity_levels['low'])['name']}",
f"风险分数: {risk_info['risk_score']}",
f"农业相关物体: {risk_info['agriculture_objects']}",
f"总检测物体: {risk_info['total_objects']}",
f"建议: {risk_info['suggestion']}"
]
bg_height = len(info_texts) * 30 + 20
draw.rectangle([10, 10, 400, bg_height], fill=(0, 0, 0, 128))
draw.rectangle([10, 10, 400, bg_height], outline=risk_color, width=2)
for i, text in enumerate(info_texts):
y_position = 35 + i * 30
draw.text((20, y_position), text, fill=(255, 255, 255), font=font)
os.makedirs('reports', exist_ok=True)
output_path = os.path.join('reports', f"result_{os.path.basename(image_path)}")
pil_image.save(output_path)
print(f"💾 结果已保存: {output_path}")
return True
except Exception as e:
print(f"❌ 可视化结果时出错: {e}")
return False
可视化特性:
- 颜色编码:不同类别使用不同颜色
- 信息面板:显示关键评估信息
- 自适应缩放:适应不同尺寸的图片
- 自动保存:将结果保存到reports文件夹
为什么需要可视化:
- 直观展示检测结果
- 帮助用户快速理解风险状况
- 便于结果分享和后续分析
第四部分:集成测试与用户界面
4.1 创建完整的检测流程
现在我们将各个模块集成起来,创建一个完整的检测流程。这个流程将图片输入转化为有用的农业建议。
在类中添加综合检测方法:
def analyze_agriculture_image(self, image_path):
"""
完整的农业图片分析流程
"""
print(f"\n🔍 开始分析图片: {os.path.basename(image_path)}")
try:
print("📷 物体检测中...")
detections = self.detect_agriculture_objects(image_path)
print(f"✅ 检测到 {len(detections)} 个物体")
if detections:
categories = set([d['category'] for d in detections])
print(f"📋 检测到的类别: {', '.join(categories)}")
for i, det in enumerate(detections[:5]):
print(f" - {det['name']} ({det['category']}): {det['confidence']:.3f}")
if len(detections) > 5:
print(f" ... 还有 {len(detections) - 5} 个物体")
print("⚠️ 风险评估中...")
risk_assessment = self.assess_pest_risk(detections)
report = {
'image_info': os.path.basename(image_path),
'detection_summary': {
'total_detections': len(detections),
'animals_detected': len([d for d in detections if d['category'] == 'animal']),
'vehicles_detected': len([d for d in detections if d['category'] == 'vehicle']),
'other_detected': len([d for d in detections if d['category'] == 'other']),
'agriculture_detected': risk_assessment['agriculture_objects']
},
'risk_assessment': risk_assessment,
'detected_objects': detections,
'timestamp': self._get_current_time()
}
print("✅ 图片分析完成")
return report
except Exception as e:
print(f"❌ 分析过程中出错: {e}")
return None
def _get_current_time(self):
"""获取当前时间字符串"""
return datetime.now().strftime("%Y-%m-%d %H:%M:%S")
def get_supported_categories(self):
"""获取支持的检测类别"""
return self.agriculture_categories.copy()
def get_severity_levels(self):
"""获取风险等级定义"""
return self.severity_levels.copy()
if __name__ == "__main__":
print("测试农业病虫害检测器...")
detector = AgriculturePestDetector()
print("\n📋 支持的检测类别:")
categories = detector.get_supported_categories()
for category, items in categories.items():
print(f" {category}: {', '.join(items) if items else '无'}")
print("\n✅ 农业病虫害检测器测试完成!")
4.2 创建用户友好的主程序
最后,我们需要创建一个用户友好的界面,让用户能够方便地使用我们的检测系统。
创建或修改 main.py:
import os
import sys
from agriculture_pest_detector import AgriculturePestDetector
os.environ['KMP_DUPLICATE_LIB_OK'] = 'True'
def print_detection_report(report):
"""打印详细的检测报告"""
print("\n" + "=" * 60)
print("📊 农业病虫害检测报告")
print("=" * 60)
print(f"📷 分析图片: {report['image_info']}")
print(f"⏰ 分析时间: {report['timestamp']}")
summary = report['detection_summary']
print(f"\n🔍 检测统计:")
print(f" 总检测物体: {summary['total_detections']}")
print(f" 农业相关物体: {summary['agriculture_detected']}")
print(f" 动物数量: {summary['animals_detected']}")
print(f" 车辆数量: {summary['vehicles_detected']}")
print(f" 其他物体: {summary['other_detected']}")
risk = report['risk_assessment']
print(f"\n⚠️ 风险评估:")
print(f" 风险等级: {risk['risk_level']}")
print(f" 风险分数: {risk['risk_score']}")
print(f" 检测类别: {', '.join(risk['detected_categories']) if risk['detected_categories'] else '无'}")
print(f" 处理建议: {risk['suggestion']}")
if report['detected_objects']:
print(f"\n🔎 检测到的物体详情:")
agriculture_objects = [obj for obj in report['detected_objects'] if obj['category'] != 'other']
if agriculture_objects:
for obj in agriculture_objects:
print(f" - {obj['name']} ({obj['category']}): 置信度 {obj['confidence']:.3f}")
else:
print(" - 未检测到农业相关物体")
other_objects = [obj for obj in report['detected_objects'] if obj['category'] == 'other']
if other_objects:
print(f"\n🔍 其他检测到的物体:")
for obj in other_objects[:3]:
print(f" - {obj['name']}: 置信度 {obj['confidence']:.3f}")
if len(other_objects) > 3:
print(f" ... 还有 {len(other_objects) - 3} 个其他物体")
else:
print(f"\n🔎 检测到的物体详情: 无")
print("=" * 60)
def main():
print("=" * 60)
print("🌱 基于YOLOv5的农业病虫害检测系统")
print("=" * 60)
try:
detector = AgriculturePestDetector()
except Exception as e:
print(f"❌ 检测器初始化失败: {e}")
return
os.makedirs('reports', exist_ok=True)
os.makedirs('data', exist_ok=True)
while True:
print("\n请选择操作:")
print("1. 检测单张图片")
print("2. 批量检测data文件夹中的图片")
print("3. 查看系统说明")
print("4. 退出系统")
choice = input("请输入选择 (1/2/3/4): ").strip()
if choice == "1":
image_path = input("请输入图片路径: ").strip()
if not os.path.exists(image_path):
print("❌ 图片路径不存在,请检查路径")
continue
report = detector.analyze_agriculture_image(image_path)
if report:
print_detection_report(report)
print("\n💾 正在保存检测结果...")
detector.visualize_results(
image_path,
report['detected_objects'],
report['risk_assessment']
)
elif choice == "2":
if not os.path.exists('data'):
print("❌ data文件夹不存在,请先创建并添加图片")
continue
image_files = []
for file in os.listdir('data'):
if file.lower().endswith(('.jpg', '.jpeg', '.png', '.bmp')):
image_files.append(os.path.join('data', file))
if not image_files:
print("❌ data文件夹中没有找到图片文件")
print("支持的格式: JPG, JPEG, PNG, BMP")
continue
print(f"找到 {len(image_files)} 张图片:")
for i, img_path in enumerate(image_files, 1):
print(f" {i}. {os.path.basename(img_path)}")
for i, img_path in enumerate(image_files, 1):
print(f"\n处理第 {i}/{len(image_files)} 张图片...")
report = detector.analyze_agriculture_image(img_path)
if report:
print_detection_report(report)
print("💾 正在保存检测结果...")
detector.visualize_results(
img_path,
report['detected_objects'],
report['risk_assessment']
)
elif choice == "3":
print("\n📖 系统说明:")
print(" 本系统基于YOLOv5深度学习模型,能够检测农田图片中的:")
print(" - 🐄 动物类: 鸟类、猫、狗、牛羊、马等")
print(" - 🚜 车辆类: 汽车、卡车、公交车、摩托车等")
print("\n💡 使用建议:")
print(" - 确保图片清晰,光线充足")
print(" - 目标物体在图片中大小适中")
print(" - 支持的格式: JPG, JPEG, PNG, BMP")
print("\n⚠️ 注意:")
print(" - 当前版本使用YOLOv5预训练模型")
print(" - 检测结果将保存至reports文件夹")
print(" - 实际农业应用需要定制训练")
elif choice == "4":
print("👋 感谢使用农业病虫害检测系统,再见!")
break
else:
print("❌ 无效选择,请重新输入")
if __name__ == "__main__":
try:
main()
except KeyboardInterrupt:
print("\n\n👋 程序被用户中断,再见!")
except Exception as e:
print(f"\n❌ 程序运行出错: {e}")
4.3 系统测试与验证
现在我们的系统已经完成,让我们进行全面的测试来确保所有功能正常工作。
测试步骤:
- 准备测试数据:
- 在
data 文件夹中放入一些包含昆虫、动物、车辆的图片 - 可以从网上下载或使用手机拍摄
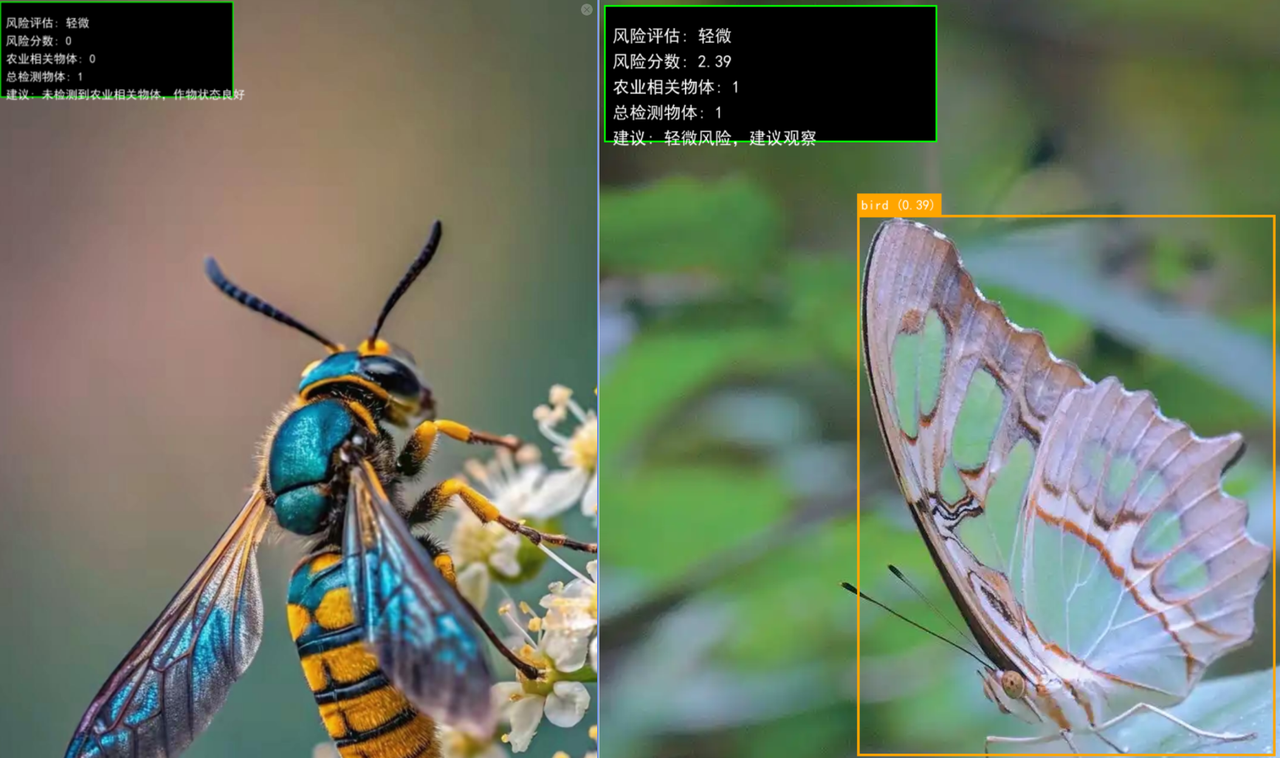
- 运行系统测试结果示例:
五、总结
通过这个完整的教程,我们成功创建了一个基于YOLOv5的农业病虫害检测系统。这个项目展示了:
- 环境配置:PyCharm项目创建和依赖管理
- 模块化设计:清晰的代码结构和职责分离
- 核心算法:YOLOv5目标检测和风险评估
- 用户体验:友好的交互界面和可视化结果
- 实用价值:解决农业实际问题的应用
这个项目不仅提供了可运行的代码,更重要的是展示了如何将深度学习技术应用于解决实际行业问题的方法论。