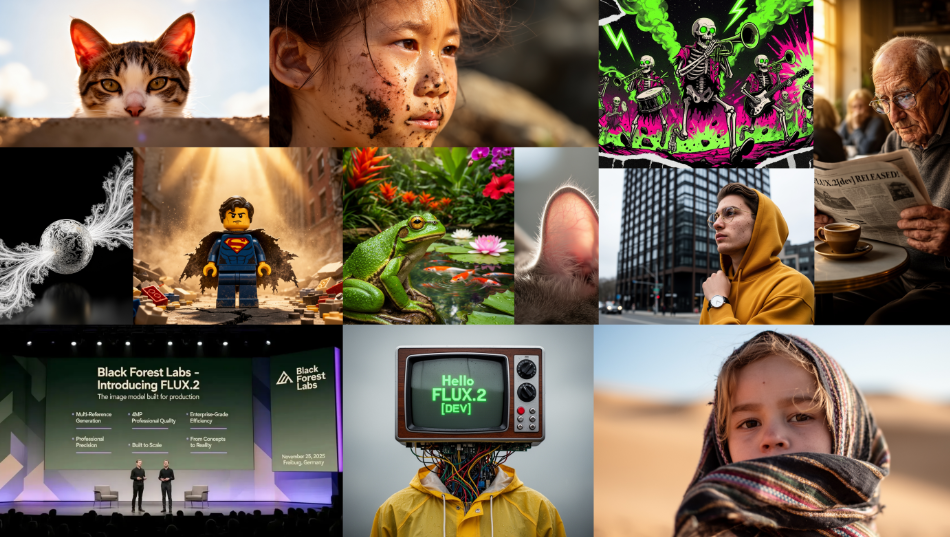
图像生成能力已成为高端智能设备标配,是差异化竞争的关键因素,而 FLUX.2 是黑森林实验室(Black Forest Labs)最新推出的图像生成模型系列,其前代产品为 Flux.1 系列。这是一款全新模型,采用全新架构,且预训练过程从零开始!
在本文中,我们将探讨 FLUX.2 引入的关键变化、不同配置下的推理实现方式,以及 LoRA 微调方法。
FLUX.2 简要介绍
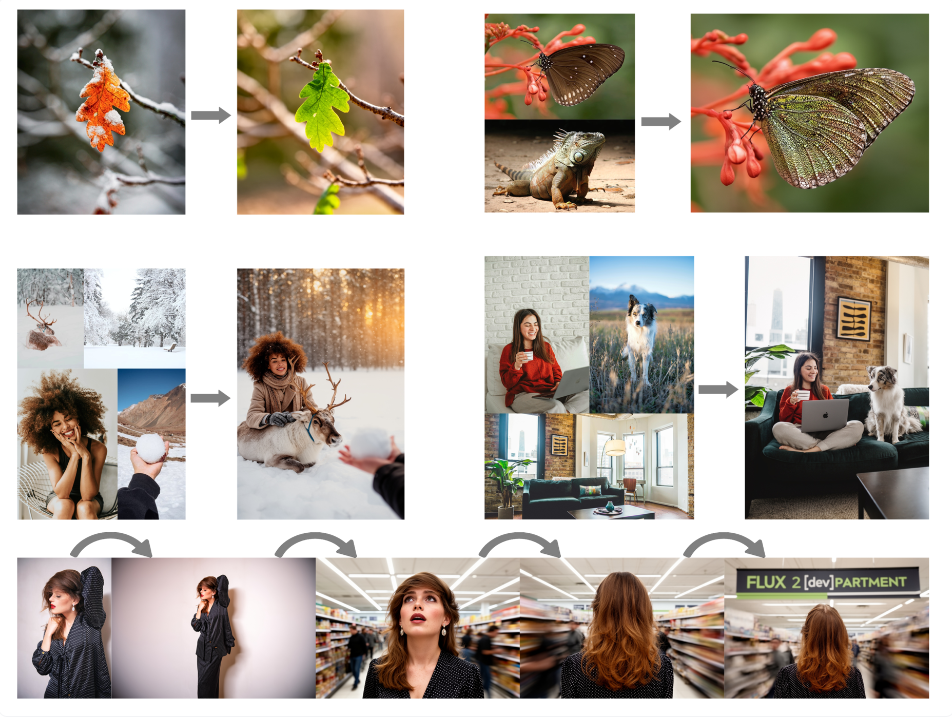
FLUX.2 支持图像引导与文本引导两种图像生成模式,同时可接收多张图像作为参考输入,进而生成最终输出结果。以下为 FLUX.2 的核心升级点简述:
文本编码器 与 Flux.1 采用双文本编码器的设计不同,FLUX.2 仅搭载单个文本编码器 ——Mistral Small 3.1。这一简化设计大幅降低了提示词嵌入的计算复杂度,其支持的最大序列长度为 512。
扩散 Transformer(DiT) FLUX.2 延续了 Flux.1 的整体架构框架,即多模态扩散 Transformer(MM-DiT)+ 并行 DiT 架构。补充说明:MM-DiT 块先分别处理图像潜变量与条件文本,仅在注意力运算阶段融合两者,因此被称为 “双流块”;并行块则对拼接后的图像流与文本流进行统一处理,属于 “单流块”。
FLUX.2 相对于 Flux.1 在 DiT 架构上的关键优化如下:
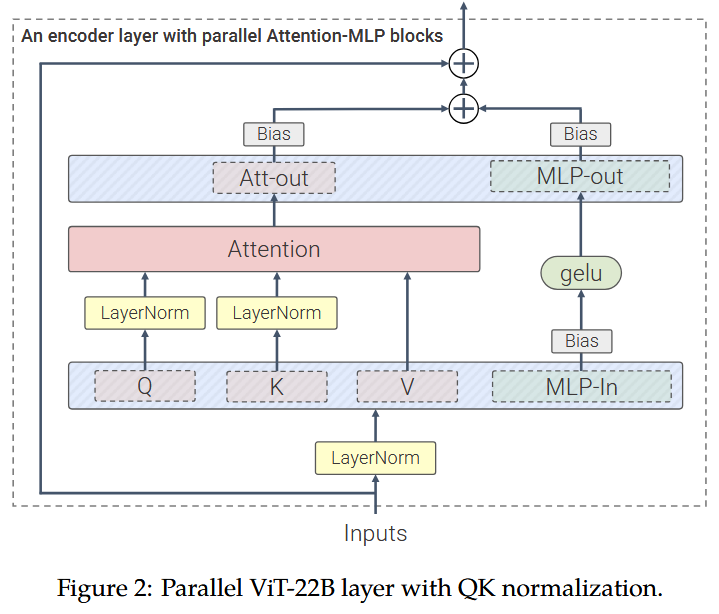
时间信息与引导信息(以 AdaLayerNorm-Zero 调制参数形式存在)分别在所有双流块、单流块间共享,替代了 Flux.1 中为每个块单独配置调制参数的设计; 模型所有层均不包含偏置参数(bias parameters),尤其是两种 Transformer 块的注意力子块与前馈(FF)子块,其各层均未使用偏置参数; Flux.1 的单流 Transformer 块仅融合注意力输出投影与前馈输出投影,而 FLUX.2 的单流块进一步将注意力 QKV 投影与前馈输入投影融合,形成完全并行的 Transformer 块:
注:与上图所示的 ViT-22B 块相比,FLUX.2 采用 SwiGLU 风格的 MLP 激活函数(非 GELU 激活函数),且同样不包含偏置参数。
FLUX.2 中单流块的占比显著提升:双流块 8 个、单流块 48 个(Flux.1 为 19 个双流块、38 个单流块)。这一调整使得单流块在 DiT 总参数中的占比大幅增加:Flux.1 [dev]-12B 中双流块参数占比约 54%,而 FLUX.2 [dev]-32B 中双流块参数占比仅 24%(单流块参数占比达 73%)。 其他核心改进 全新自研自编码器(Autoencoder); 优化分辨率相关时间步调度的整合逻辑。
基于 Diffusers 的推理实现
FLUX.2 采用更大规模的 DiT 架构,并以 Mistral3 Small 作为文本编码器。若不进行任何卸载处理,仅推理过程就需占用超过 80GB 显存。以下将介绍适配不同系统资源的 FLUX.2 推理方案:
安装与认证流程 运行以下代码片段前,请确保已从主分支安装 diffusers 库,并通过 hf auth login 完成认证:
Plain Bash C++ C# CSS Diff HTML/XML Java Javascript Markdown PHP Python Ruby SQL pip uninstall diffusers -y && pip install git+https://github.com/huggingface/diffusers -U
常规推理方案 python 运行
Plain Bash C++ C# CSS Diff HTML/XML Java Javascript Markdown PHP Python Ruby SQL from diffusers import Flux2Pipeline
import torch
repo_id = "black-forest-labs/FLUX.2-dev"
pipe = Flux2Pipeline.from_pretrained(repo_id, torch_dtype=torch.bfloat16)
pipe.enable_model_cpu_offload()
image = pipe(
prompt="dog dancing near the sun" ,
num_inference_steps=50 ,
guidance_scale=4 ,
height=1024 ,
width=1024
).images[0 ]
上述代码已在 H100 显卡上完成测试:若不启用 CPU 卸载,该显卡无法支撑推理运行;启用 CPU 卸载后,运行时显存占用约 62GB。
拥有 Hopper 系列 GPU 的用户可通过 Flash Attention 3 加速推理:
python 运行
Plain Bash C++ C# CSS Diff HTML/XML Java Javascript Markdown PHP Python Ruby SQL from diffusers import Flux2Pipeline
import torch
repo_id = "black-forest-labs/FLUX.2-dev"
pipe = Flux2Pipeline.from_pretrained(repo_id, torch_dtype=torch.bfloat16)
pipe.transformer.set_attention_backend("_flash_3_hub" )
pipe.enable_model_cpu_offload()
image = pipe(
prompt="dog dancing near the sun" ,
num_inference_steps=50 ,
guidance_scale=2.5 ,
height=1024 ,
width=1024
).images[0 ]
支持的注意力后端详情可查阅: https://huggingface.co/docs/diffusers/main/en/optimization/attention (提供多种后端选择)
资源受限场景适配方案
方案 1:4 位量化部署
通过 bitsandbytes 库,可将 Transformer 与文本编码器模型以 4 位精度加载,使 24GB 显存 GPU 支持本地运行。以下代码可在剩余显存约 20GB 的 GPU 上执行:
python 运行
Plain Bash C++ C# CSS Diff HTML/XML Java Javascript Markdown PHP Python Ruby SQL from diffusers import Flux2Pipeline
import torch
from bitsandbytes import quantization_config
bnb_config = quantization_config.BitsAndBytesConfig(
load_in_4bit=True ,
bnb_4bit_quant_type="nf4" ,
bnb_4bit_compute_dtype=torch.bfloat16,
bnb_4bit_use_double_quant=True ,
)
repo_id = "black-forest-labs/FLUX.2-dev"
pipe = Flux2Pipeline.from_pretrained(
repo_id,
torch_dtype=torch.bfloat16,
quantization_config=bnb_config,
device_map="auto" ,
)
image = pipe(
prompt="dog dancing near the sun" ,
num_inference_steps=50 ,
guidance_scale=4 ,
height=1024 ,
width=1024
).images[0 ]
方案 2:本地 + 远程混合推理
借助 Diffusers 流水线的模块化特性,可将各模块拆分后按序运行。通过将文本编码器解耦并部署至推理端点(Inference Endpoint),可释放显存仅用于 DiT 与 VAE 模型。
注意:使用远程文本编码器需具备有效令牌(token),已完成认证则无需额外操作。
以下示例结合本地推理与远程推理,并通过 bitsandbytes 对 DiT 进行 NF4 量化,可在剩余显存 18GB 的 GPU 上运行:
python 运行
Plain Bash C++ C# CSS Diff HTML/XML Java Javascript Markdown PHP Python Ruby SQL from diffusers import Flux2Pipeline
import torch
from bitsandbytes import quantization_config
bnb_config = quantization_config.BitsAndBytesConfig(
load_in_4bit=True ,
bnb_4bit_quant_type="nf4" ,
bnb_4bit_compute_dtype=torch.bfloat16,
)
repo_id = "black-forest-labs/FLUX.2-dev"
pipe = Flux2Pipeline.from_pretrained(
repo_id,
torch_dtype=torch.bfloat16,
quantization_config=bnb_config,
device_map="auto" ,
remote_text_encoder=True ,
)
image = pipe(
prompt="dog dancing near the sun" ,
num_inference_steps=50 ,
guidance_scale=4 ,
height=1024 ,
width=1024
).images[0 ]
对于显存更小的 GPU,可启用分组卸载(group_offloading)功能,使剩余显存 8GB 的 GPU 也能运行(需搭配 32GB 剩余内存);若可接受性能损耗,可设置 low_cpu_mem_usage=True,将内存需求降至 10GB:
python 运行
Plain Bash C++ C# CSS Diff HTML/XML Java Javascript Markdown PHP Python Ruby SQL from diffusers import Flux2Pipeline
import torch
repo_id = "black-forest-labs/FLUX.2-dev"
pipe = Flux2Pipeline.from_pretrained(
repo_id,
torch_dtype=torch.bfloat16,
low_cpu_mem_usage=True ,
)
pipe.enable_model_cpu_offload()
pipe.enable_group_offloading()
image = pipe(
prompt="dog dancing near the sun" ,
num_inference_steps=50 ,
guidance_scale=4 ,
height=1024 ,
width=1024
).images[0 ]
其他支持的量化后端: https://huggingface.co/docs/diffusers/main/en/optimization/quantization
其他内存优化技巧: https://huggingface.co/docs/diffusers/main/en/optimization/memory
如需对比不同量化方式对生成效果的影响,可通过以下交互界面体验: FLUX.2 量化实验空间
多图像参考输入
FLUX.2 支持最多 10 张图像作为参考输入(每张新增图像会增加显存占用)。可通过索引(如 “image 1”“image 2”)或自然语言(如 “袋鼠”“乌龟”)引用参考图像,建议结合两种方式以获得最佳效果:
python 运行
Plain Bash C++ C# CSS Diff HTML/XML Java Javascript Markdown PHP Python Ruby SQL from diffusers import Flux2Pipeline
import torch
from PIL import Image
image1 = Image.open ("turtle.jpg" ).convert("RGB" )
image2 = Image.open ("kangaroo.jpg" ).convert("RGB" )
repo_id = "black-forest-labs/FLUX.2-dev"
pipe = Flux2Pipeline.from_pretrained(repo_id, torch_dtype=torch.bfloat16)
pipe.enable_model_cpu_offload()
prompt = """
融合 image 1(乌龟)的风格与 image 2(袋鼠)的姿态,背景设置为阳光穿透树叶的热带森林。
"""
image = pipe(
prompt=prompt,
image=[image1, image2],
num_inference_steps=50 ,
guidance_scale=4 ,
height=1024 ,
width=1024
).images[0 ]
多图像输入效果示例:
高级提示词技巧
FLUX.2 支持结构化 JSON 提示、十六进制颜色精准控制、多参考图像编辑等高级功能。这些特性不仅能实现精细化调控,还可在保持整体场景不变的前提下修改特定元素。
基础 JSON 模板(源自 FLUX.2 官方提示词指南):
Plain Bash C++ C# CSS Diff HTML/XML Java Javascript Markdown PHP Python Ruby SQL {
"scene" : "整体场景描述" ,
"subjects" : [
{
"description" : "主体详细描述" ,
"position" : "画面中的位置" ,
"action" : "动作描述"
}
],
"style" : "艺术风格" ,
"color_palette" : ["#十六进制颜色1" , "#十六进制颜色2" , "#十六进制颜色3" ],
"lighting" : "光线描述" ,
"mood" : "情感基调" ,
"background" : "背景细节" ,
"composition" : "构图与布局" ,
"camera" : {
"angle" : "拍摄角度" ,
"lens" : "镜头类型" ,
"depth_of_field" : "景深效果"
}
}
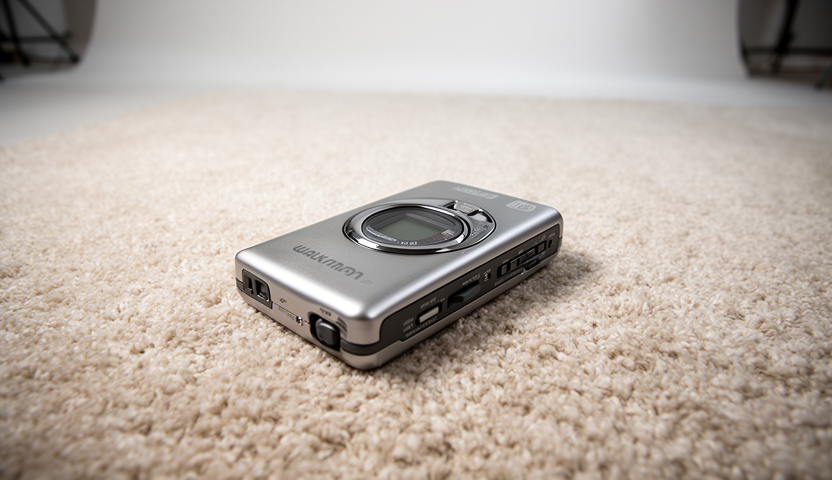
基于上述模板,构建 “地毯上的老式随身听” 产品拍摄提示词(可直接传入任意 Diffusers 推理示例):
python 运行
Plain Bash C++ C# CSS Diff HTML/XML Java Javascript Markdown PHP Python Ruby SQL prompt = """
{
"scene": "专业工作室产品拍摄场景,搭配柔质地毯表面",
"subjects": [
{
"description": "银色老式随身听放置在空房间中央的地毯上",
"pose": "静止平放",
"position": "地毯前景中央位置",
"color_palette": ["磨砂银", "深灰色点缀"]
}
],
"style": "商业级超写实产品摄影风格",
"color_palette": ["磨砂银", "中性米色", "柔和白色高光"],
"lighting": "三点式柔光箱布光,形成柔和扩散高光,无明显硬阴影",
"mood": "简洁、专业、极简主义",
"background": "柔质地毯表面,搭配简约工作室背景,营造空房间氛围",
"composition": "三分法构图",
"camera": {
"angle": "高角度",
"distance": "中景拍摄",
"focus": "精准对焦随身听金属质感与物理按键",
"lens-mm": 85,
"f-number": "f/5.6",
"ISO": 200
}
}
"""
生成效果:
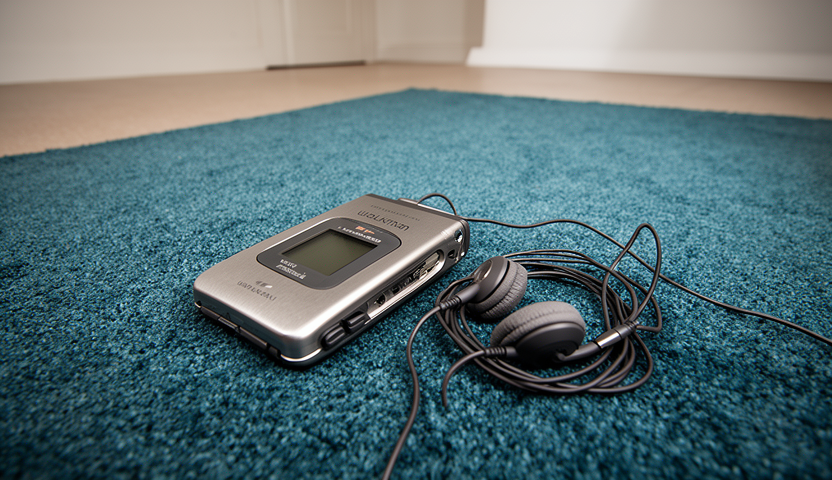
修改版提示词(地毯颜色改为青蓝色 #367588,新增有线耳机):
python 运行
Plain Bash C++ C# CSS Diff HTML/XML Java Javascript Markdown PHP Python Ruby SQL prompt = """
{
"scene": "专业工作室产品拍摄场景,搭配柔质地毯表面",
"subjects": [
{
"description": "银色老式随身听放置在青蓝色地毯(#367588)上,空房间中央位置,已连接有线耳机",
"pose": "静止平放",
"position": "地毯前景中央位置",
"color_palette": ["磨砂银", "深灰色点缀", "#367588"]
},
{
"description": "有线耳机连接随身听,线缆在地毯上松散盘绕",
"pose": "静止状态",
"position": "随身听旁侧,部分位于前方地毯上",
"color_palette": ["深灰色", "柔黑色", "#367588"]
}
],
"style": "商业级超写实产品摄影风格",
"color_palette": ["磨砂银", "#367588", "中性米色", "柔和白色高光"],
"lighting": "三点式柔光箱布光,形成柔和扩散高光,无明显硬阴影",
"mood": "简洁、专业、极简主义",
"background": "青蓝色柔质地毯表面(#367588),搭配简约工作室背景,营造空房间氛围",
"composition": "三分法构图",
"camera": {
"angle": "高角度",
"distance": "中景拍摄",
"focus": "精准对焦随身听金属质感、有线耳机与地毯纤维",
"lens-mm": 85,
"f-number": "f/5.6",
"ISO": 200
}
}
"""
修改后效果:
此时地毯颜色与指定十六进制颜色码完全一致,且未改变整体场景风格。更多示例可查阅官方提示词指南: https://docs.bfl.ai/guides/prompting_guide_flux2
LoRA 微调
FLUX.2 同时支持文本到图像、图像到图像生成,适配多种场景的微调需求!但由于仅推理就需占用 80GB+ 显存,消费级 GPU 进行 LoRA 微调难度较高。通过融合前文提及的推理优化技术与共享内存节省方案,可大幅降低内存消耗,支持通过以下 diffusers 代码或 Ostris' AI Toolkit 进行训练。
本文提供文本到图像、图像到图像两种训练脚本,以下重点介绍文本到图像训练示例:
微调内存优化技术
以下技术可组合使用以进一步降低内存占用(部分技术互斥,需提前确认兼容性):
梯度检查点(Gradient Checkpointing):以少量计算速度为代价,减少激活内存占用; 远程文本编码器(Remote Text Encoder):文本编码器部署至远程推理端点,本地仅加载 DiT 与 VAE; 潜变量缓存(Cache Latents):提前计算并缓存图像潜变量,避免训练过程中重复编码; FP8 训练(FP8 Training):采用 FP8 精度训练,平衡效果与内存占用; QLoRA 量化:通过 bitsandbytes 实现 4 位量化,适配不支持 FP8 训练的硬件; 8 位优化器(8-bit Adam):使用 8 位精度 Adam 优化器,减少优化器状态内存占用。
训练前请查阅前置要求: 训练脚本 README
训练示例(FP8 训练) 本示例使用 multimodalart/1920-raider-waite-tarot-public-domain 数据集,采用 FP8 训练配置,可根据需求调整超参数:
Plain Bash C++ C# CSS Diff HTML/XML Java Javascript Markdown PHP Python Ruby SQL accelerate launch train_dreambooth_lora_flux2.py \
--pretrained_model_name_or_path="black-forest-labs/FLUX.2-dev" \
--mixed_precision="bf16" \
--gradient_checkpointing \
--remote_text_encoder \
--cache_latents \
--caption_column="caption" \
--do_fp8_training \
--dataset_name="multimodalart/1920-raider-waite-tarot-public-domain" \
--output_dir="tarot_card_Flux2_LoRA" \
--instance_prompt="trcrd tarot card" \
--resolution=1024 \
--train_batch_size=2 \
--guidance_scale=1 \
--gradient_accumulation_steps=1 \
--optimizer="adamW" \
--use_8bit_adam\
--learning_rate=1e-4 \
--report_to="wandb" \
--lr_scheduler="constant_with_warmup" \
--lr_warmup_steps=200 \
--checkpointing_steps=250 \
--max_train_steps=1000 \
--rank=8 \
--validation_prompt="a trtcrd of a person on a computer, on the computer you see a meme being made with an ancient looking trollface, 'the shitposter' arcana, in the style of TOK a trtcrd, tarot style" \
--validation_epochs=25 \
--seed="0" \
--push_to_hub
LoRA 微调效果对比
左图为预训练 FLUX.2 模型生成结果,右图为 LoRA 微调后生成结果。
非 FP8 训练适配方案(QLoRA)
若硬件不支持 FP8 训练,可通过 bitsandbytes 进行 QLoRA 微调。首先创建 config.json 量化配置文件:
Plain Bash C++ C# CSS Diff HTML/XML Java Javascript Markdown PHP Python Ruby SQL {
"load_in_4bit": true,
"bnb_4bit_quant_type": "nf4"
}
在训练命令中指定量化配置文件路径:
Plain Bash C++ C# CSS Diff HTML/XML Java Javascript Markdown PHP Python Ruby SQL !accelerate launch train_dreambooth_lora_flux2.py \
--pretrained_model_name_or_path="black-forest-labs/FLUX.2-dev" \
--mixed_precision="bf16" \
--gradient_checkpointing \
--remote_text_encoder \
--cache_latents \
--caption_column="caption"\
--bnb_quantization_config_path="config.json" \
--dataset_name="multimodalart/1920-raider-waite-tarot-public-domain" \
--output_dir="tarot_card_Flux2_LoRA" \
--instance_prompt="a tarot card" \
--resolution=1024 \
--train_batch_size=2 \
--guidance_scale=1 \
--gradient_accumulation_steps=1 \
--optimizer="adamW" \
--use_8bit_adam\
--learning_rate=1e-4 \
--report_to="wandb" \
--lr_scheduler="constant_with_warmup" \
--lr_warmup_steps=200 \
--max_train_steps=1000 \
--rank=8\
--validation_prompt="a trtcrd of a person on a computer, on the computer you see a meme being made with an ancient looking trollface, 'the shitposter' arcana, in the style of TOK a trtcrd, tarot style" \
--seed="0"
相关资源 FLUX.2 模型仓库: https://huggingface.co/black-forest-labs/FLUX.2-dev Diffusers 官方文档: https://huggingface.co/docs/diffusers FLUX.2 提示词指南: https://docs.bfl.ai/guides/prompting_guide_flux2 训练脚本仓库: https://github.com/huggingface/diffusers/tree/main/examples/dreambooth_flux2 量化实验空间: https://huggingface.co/spaces/black-forest-labs/FLUX.2-quantization
来源:https://huggingface.co/blog/flux-2